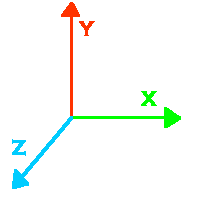
Off we go again then. All distances in VRML are measured in metres. This doesn't matter so much in your own world, as long as you're consistent, but if you want to link to other people's worlds or use external files, it's a good idea to keep to the standard. The VRML co-ordinate system works as shown in the diagram below:

The X-Axis is horizontal, Y is vertical, and Z is coming out of the screen at you.
Rotations in VRML work by the right-hand rule. If you imagine wrapping your hand around one of the axes, with your thumb pointing in the positive direction, the direction of positive rotation is the same as the direction that your fingers wrap around in, ie anticlockwise looking in a positive direction. This is true for rotations about any axis, so if you want to rotate an object 90 degrees away from you around the X axis, you would use a 90 degree negative rotation. This also applies to rotations about arbitrary axes, as explained later on in this tutorial. One other point to make is that all rotations are measured in radians not degrees. So, to do the rotation described above, you would in fact do a rotation of -1.57 around the X axis. Below is a quick reference for degrees to radians conversion. In general, multiply the number of degrees by pi/180.
| Degrees | Radians |
| 0 | 0 |
| 45 | 0.78 |
| 90 | 1.57 |
| 135 | 2.36 |
| 180 | 3.14 (pi) |
| 225 | 3.93 |
| 270 | 4.71 |
| 315 | 5.5 |
| 360 | 6.28 (2*pi) |
Right. In order to make our world any use at all, we need to be able to transform objects. VRML has three types of transformations we can apply to objects. These are translation, rotation, and Scaling. These are used in a Transform node. A Transform node doesn't have to have all three in it. You can just have a rotation, for instance. The transformations within a Transform apply to the children of the node. This is called nesting, where a node can have any number of child nodes. The syntax for this is shown in the example below, along with the syntax for a Transform node.
Transform {
	translation 1 1 1
	rotation 0 1 0 0.78
	scale 2 1 2
	children [
		USE FBOX
	]
A Transform node can have another nested inside it as a child, which allows you to do sequences of transformations. Remember, the order of transformations matters. A rotation followed by a translation is not the same as a translation followed by a rotation. Within a Transform node, the transformations are carried out in strict order: Scale, then Rotate, the Translate. So, if you want a translation followed by a rotation, you need to nest Transform nodes inside one another.
Back to the plot, we need to describe how each type of transformation works.
These two transforms are very similar. Both take three arguments; x y and z values. Translation moves the centre of the object these distances in the appropriate direction. Scale multiplies the size of the object by these values in the appropriate directions. A translation of 0 in a direction will leave the object unaffected in that direction. A scale factor of 0 will make the object infinitely thin in that direction, which is not normally desirable. A scale factor of 1 is required for no effect.
It is very important to remember that scaling takes place relative to the origin, not the centre of the object. So, in order to scale from the centre of an object, you must make sure that the object is centred on the origin. This is why scaling is done first before any rotations or translations.
Rotation is slightly different from the two previous types. It takes four arguments. The first are three co-ordinates, which define the axis of rotation, and the last is the angle to rotate by, in radians. So, to rotate 1 radian about the Y axis, for instance, you would write:
Transform {
	rotate 0 1 0 1
	children [
		USE FBOX
	]
}
The length of the rotation axis can be anything, not necessarily 1. You could use a Y value of 50 if you liked, but it wouldn't do anything.
You can see this world by clicking below:
Tutorial 2 World
Right, that's the end of this tutorial. As you can see, we're starting to get a bit more sophisticated now. Next, we get to play about with the shapes properly, by studying the geometry node in detail.


